Live
- Three persons admitted to hospital for diarrhea treatment
- First Star Outside Milky Way Captured: WOH G64 is 2,000 Times Larger Than the Sun
- Sikkim govt to constitute state Niti Ayog: CM Tamang
- CBI books Rajasthan narcotics inspector for Rs 3 lakh bribe
- Rajasthan bypolls: A tough contest between BJP and Congress
- Albania joins SEPA, paving way for EU integration
- Japanese government approves 250-billion USD economic package to ease price pain
- Six pharma companies to set up their units in Telangana
- The Unstable Events of a 17-Wicket Day in Perth: India vs Australia
- Dutch FM's Israel trip cancelled after Netanyahu's arrest warrant
Just In

There are two basic types of microscopes compound and stereo Stereo microscopes use lower power than compound microscopes do and have typical magnification levels ranging from about 10 to 40x These microscopes are very versatile and are designed for viewing whole objects such as rocks, insects, and flowers, but can also be used for viewing prepared slides They are a helpful tool for nature stu
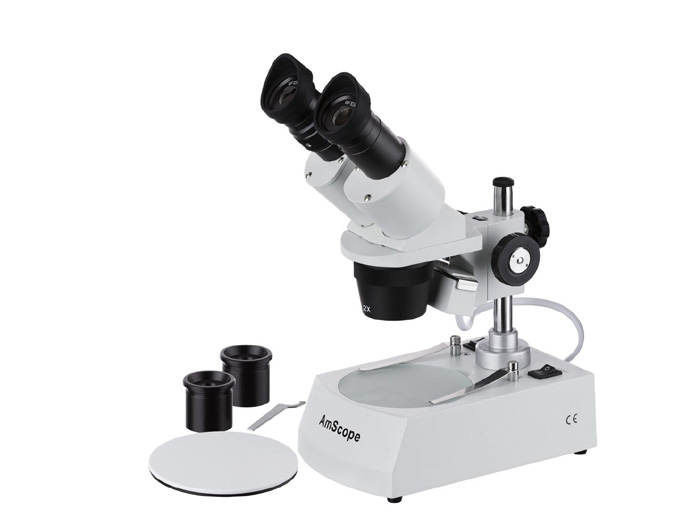
There are two basic types of microscopes: compound and stereo. Stereo microscopes use lower power than compound microscopes do and have typical magnification levels ranging from about 10 to 40x. These microscopes are very versatile and are designed for viewing whole objects such as rocks, insects, and flowers, but can also be used for viewing prepared slides. They are a helpful tool for nature studies and are ideal for young children.
Steps in Using a Stereo Microscope: Set your microscope on a tabletop or other flat sturdy surface where you will have plenty of room to work. Plug the microscope’s power cord into an outlet, making sure that the excess cord is out of the way so no one can trip over it or pull it off of the table. Switch on the light source(s). If you will be looking at a microscope slide or other transparent object, bottom lighting will work best. If the specimen you are viewing is opaque or solid (light cannot pass through it from below), use top lighting so that the light can reflect off the specimen’s surface.
Center your specimen on the stage plate. If your specimen is thin and flat, or if its edges curl up easily, try using the stage clips to hold it in place. To do this, pull up the pointed end of one stage clip and slide it over one end of the specimen, then do the same with the stage clip on the other side. If your specimen is larger than the stage plate, you might need to turn the stage clips out so that they are hanging off the stage giving you more room to work.
Adjust the eyepiece(s) so that you can look through the microscope comfortably without straining your eyes. (See below for instructions on adjusting a stereo head). For light-colored translucent specimens such as salt crystals, use either the black side of the stage plate (if it is reversible) or a piece of dark-colored construction paper to provide contrast.
If your stereo microscope has a rotating objective turret, turn it so that the marking on the objective you want to use is facing the front of the microscope. To determine the magnification of your microscope, multiply the magnification level of the eyepiece lens by that of the objective lens. For example, on the microscope in the diagram above, the total magnification at the 2x objective is 20x (2 x 10 = 20).
While looking through the eyepiece(s), slowly turn the focus knob until the specimen comes into view. Once you can see the outline of the specimen, turn even more slowly to focus as sharply as possible. If you aren’t able to see anything, try moving the specimen around slightly on the stage plate to make sure it is directly below the objective lens and then try focusing again.

© 2024 Hyderabad Media House Limited/The Hans India. All rights reserved. Powered by hocalwire.com


